How to Create a Customized Checkout Page by Hijacking the Checkout Button in Wix
- Michael Nzeribe

- Mar 20, 2025
- 7 min read
Creating a customized checkout page on your Wix store can help you build trust with your customers, personalize their experience, and provide functionalities that meet their needs, which can ultimately lead to a higher conversion rate.
A customized checkout page that meets your brand's unique needs and customers expectations can make a difference. It provides you with the flexibility to choose a suitable payment provider, reduces the possibility of abandoned carts, helps customers easily finalize their payment, and allows you to gather important information about them.
Adding these customized features to the native Wix checkout page might seem complex; however, you can hijack the checkout button and direct users to your customized checkout page with a simple click.
In this guide, we will explain the step-by-step process of how you can hijack the checkout button and direct your customers to a customized cart page by using a custom code. Let's get started!
Want to learn more? Ready to dive deeper into Wix and Velo? Take your skills to the next level with our comprehensive 'Velo for Beginners' course on Udemy. Enroll today to uncover the intricacies of Wix and Velo.
Need help with your site? The Wix Wiz team is at your side. Schedule a one-on-one consultation or have the entire team onboard with our development and support plans.
Why You Need to Hijack the Wix Checkout Button
The default shopping process on a Wix Store is quite simple: browse through products, add necessary items to your cart, click the checkout button, then it directs you to the native Wix checkout page to complete your order.
Using the native Wix checkout page to finalize orders is nice, but your site’s needs might require you to add some additional functionalities, such as directing customers to another page on your website—perhaps in case you want to build a quote request form, scenarios where you don’t need to collect payment, or because you want to use a custom payment provider.
One way to achieve this is by completely customizing the cart; you can check the series here; however, this approach can be quite complex. Since we only want the native Wix Cart page to direct customers to a customized checkout page, hijacking the checkout button provides a simple approach to achieving it.
Does that mean completely customizing the cart is outdated?
No, it is still useful in some cases where you need to change the design fundamentally or add certain features.
If you're looking to enhance user interactions with custom forms, check out our complete guide on Wix Forms to learn how to create and customize forms effectively.
How To Hijack The Wix Checkout Button
There are a few things you need to put in place to hijack the checkout button, which include:
A template site with a Wix store installed.
Custom code: This allows you to embed custom code snippets like JavaScript or HTML into your Wix site, mostly suitable for adding basic functionalities or customizing the appearance of your website. It is quite different from Velocode. Velocode is suitable when you want to add more advanced and complex features to your website.
Important Note!
To add a custom code to your website, you need to have a premium site with a custom domain.
For the purpose of this tutorial, we will be using the dev-site, which gives some premium site capabilities, but if you want to do this on your own site, then you need to upgrade.
After you have set up your Wix store template and upgraded your site, let's get into the nitty-gritty of how to hijack the checkout button using custom code.
How to Add Custom Code to Your Wix Website
Embedding custom code snippets to your Wix site gives you the flexibility of adding specific functionalities and dynamic content to your site. In this section, we will use the custom code to dynamically create a new button that directs users to a customized checkout page on your website.
To add a custom code, follow these steps:
Navigate to the ‘Settings’ section on your dashboard. Scroll down and click ‘Custom code’.

This should appear on your screen.

Now that you know where to embed your custom code snippets, let's set up our editor environment.
Step 1: Ensure you've installed the Wix store.
Step 2: Navigate to the site template's Wix ‘Cart’ page.

Notice that it is a closed-box application, which restricts us from performing certain actions.
Although some APIs allow us to interact with the cart, we generally don’t have access to the UI or the button we want to control.
Since we can’t even see the cart element in the editor, how do we control the button?
Simple, just hijack the button through the HTML itself.
How to Hijack the Checkout Button
Since we cannot edit the functionality of the checkout button through the editor, then we can bypass the process through the HTML element in the live site.
Follow these steps to achieve this:
Step 1: Navigate to the cart page live site
Step 2: Left-click the page and select ‘Inspect’.
This should appear on your screen.

We need to locate the ‘Checkout’ button right inside the dev tool panel in order to know its properties.
Step 3: Click this icon in your dev tool panel. This allows us to locate the ‘Checkout’ button inside the dev tool panel and check its properties

Step 4: Select the ‘Checkout button’ you want to inspect.
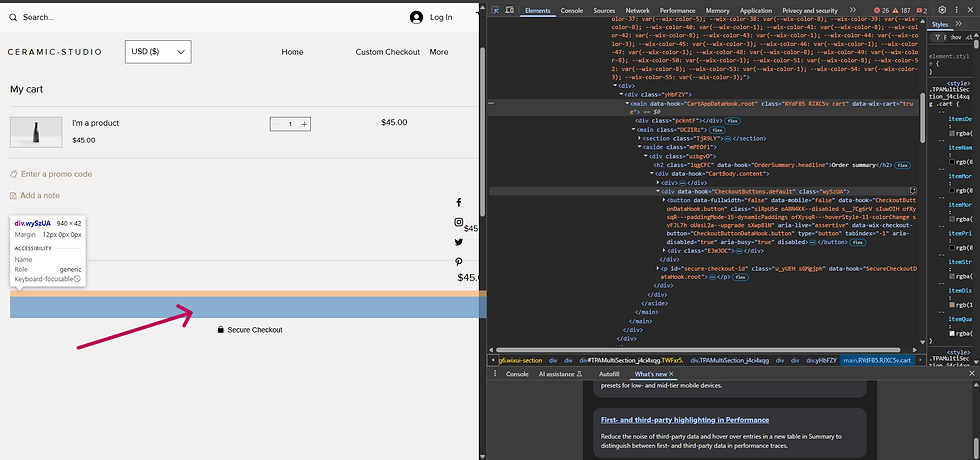
Step 5: Navigate to the Checkout button code in the dev tool.

If you inspect the checkout button code, you will notice it has a data hook of CheckButtons.default. This is because we only have a single button, and it is the default option for checkout.
If you activate the express checkout, you might see several checkout buttons like Paypal, ApplePay, or Google Pay. You may need to deactivate the express checkout if it’s causing issues with what we are trying to implement.
We are going to assume you have just one checkout button in this tutorial.
Now, let’s jump straight to implementing our functionality, i.e., linking customers to another page on the site once the button is clicked.
To achieve this, we are going to replace the code in the button element with plain JavaScript that will implement our desired functionality.
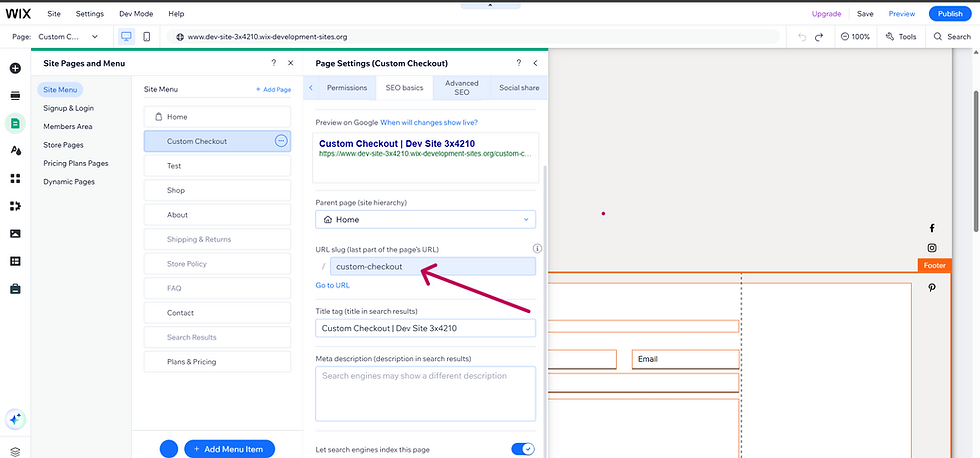
First off, let's create a new page in the editor. I.e., the page we want to link users to once the button is clicked.
Step 1: Navigate to the ‘Page & Menu’ section and click the ‘Add page’ icon.

Step 2: Create a blank page.

Step 3: Add a title to the page.

Step 4: Verify its URL by clicking the icon next to the ‘Custom Checkout’ and navigate to the ‘SEO’ basics section to ensure the URL is correct.
Step 5: Click the ‘Add Elements’ icon and add a title to the page. This will make it easier to know we are on the right page once the button is clicked.

Step 6: Enter your text.

Step 7: Hit the publish button to publish the site.

The next step is to ensure that once the checkout button is clicked, it will take the user directly to this page we just created.
To add this functionality, follow these steps:
Step 1: Navigate to the custom code section.
Step 2: Click the Body - End section.

Step 3: Paste this code in the Body - End section.

The code explanation
An event listener of DOMContentLoaded is added to the document, which only executes a function when the page loads.
Inside the replaceCheckoutButton function, the querySelector element then selects the button using the data-wix-checkout-button attribute. Then, its value is stored in the originalButton variable.
The conditional statement checks if the original button exists. If it exists, it creates a new button using the createElement attribute and stores it in the newButton variable.
A ‘Checkout’ text is then added dynamically to the new button using textContent. The same class as the old button is then added using className to the new button to retain its old styling.
Then style elements are added to the button to make it visually appealing.
The click event listener is then added to the button to navigate to the ‘Custom checkout’ page once the button is clicked.
The originalButton.replaceWith(newButton) replaces the old button with the new button we just created.
The replaceCheckoutButton function is then invoked immediately after the page loads.
To prevent Wix from reverting the button to the old one once it is clicked, MutationObserver is used to watch for changes in the DOM, i.e., if Wix tries to re-render the button. Then, if the old button reappears, replaceCheckoutButton() runs again to replace it
Step 4: Rename the custom code to a more friendly name to make it easier to find on your list later on.

Step 5: To make the code work only on the Cart page, change the page from ‘All pages’ to ‘Cart’ page only.

Step 6: Place the code in the Body - end to make the code only run after all the HTML on the page loads.

Step 7: Click ‘Apply’ to apply all the changes you have made.

Now that we have dynamically added our new functionalities using custom code, let’s get to see the functionality in action.
Step 1: Navigate to the live site.
Step 2: Refresh the page. You don’t need to republish the site because custom codes are active as long as they are toggled on and will work just by refreshing the page.
Step 3: Click the checkout button.

Notice how it directly navigates to the custom checkout page instead of the native WIX checkout page.

Voilà! We have successfully implemented our functionality to redirect customers to our customized checkout page with just a click.
Now, you can add more functionalities using Wix APIs, like custom forms, to customize the checkout experience.
Conclusion
Creating a customized checkout page offers several benefits, but implementing it on your website while using the native Wix cart page can be daunting and complex. In this article, you learned how to bypass this complex process by hijacking the checkout button and directing customers to a customized checkout page using a custom code.
Now that you have successfully added this functionality, you can further enhance it by adding more features and functionalities to your customized checkout page.
Want to learn more? Ready to dive deeper into Wix and Velo? Take your skills to the next level with our comprehensive Velo for Beginners' course on Udemy. Enroll today to uncover the intricacies of Wix and Velo.
Need help with your site? The Wix Wiz team is at your side. Schedule a one-on-one consultation or have the entire team onboard with our development and support plans.
Comments